Building Pinewood Derby Car Using LEGO® parts
LEGO® Pinewood Derby Car Design Guide
Have you ever wondered could happen if you attached LEGO® parts to a wooden Pinewood Derby block? We've done it—and the possibilities are endless fun.
How to Build a LEGO® Pinewood Derby Car
About the Author: Joe Gargiulo, Pinewood Pro Founder
Most Pinewood Derby race rules require you to use the wooden block, wheels, and axles from the official kit issued for that race. This guide tells you how to build a LEGO® Pinewood Derby car using the official Pinewood Derby parts from your kit so you can race your LEGO® car in an official BSA Cub Scout or similar Pinewood Derby race.
If you are NOT required to use the wood block, wheels, and axles from your kit, then you can build a complete, fast LEGO® Derby Car using Pinewood Pro's new PRO Brick Wheel Assembly and Zinc Brick Weight that snap into any LEGO® part. Read our Guide for Building a LEGO® Derby Car for Racing.
Drill Your Pinewood Block First!
You must use the official Pinewood Derby block as the base of your car because it is required by all Pinewood derby rules.
Before doing anything else to your block, I strongly recommend drilling your axle slots. While drilling axle holes is not required, this will save you lots of time and help you avoid several problems. Consider these advantages:
- Your car will steer straight, and cars that roll straight are faster because they don't lose valuable speed when they bang off the center rail.
- The axle slots in Pinewood Derby blocks are square and too small for the axle; it is invariably difficult to insert a round axle into a square hole. This usually forces you to use a hammer, making it impossible to get your axles straight.
- If you drill the axle holes, you can literally push the axles in with your finger!
- If the axle slot is not drilled, your block can crack when you force the axle in.
- If your rules allow drilling new axle holes, you can also consider drilling new axle holes closer to the edge of the block to create an extended wheelbase for better stability.
If you have a drill press (or know someone with one), you can drill the axle slot or drill new axle holes. I've found a #43 drill bit to be the optimal diameter for Pinewood Derby axles.
If you don't have a drill press, the PRO Driller Tool from Pinewood Pro is easy to use and comes with a 2.2mm drill bit.
The perfect block to build a LEGO® Pinewood Derby car is a BSA block cut 1/2" high.
While you can make the block even thinner, you risk developing cracks, especially if you don't drill the axle holes.
1/2" also leaves enough wood for tungsten cylinders to weight your car.

Thin Cut Pinewood Derby Car block

Thin Cut Pinewood Derby Car with LEGO® plates
If you don't want to cut your block or drill axle holes, you might want to use the Drilled Wedge Block that features drilled axle holes with a raised wheel option. It also includes pre-drilled 3/8" weight holes for tungsten cylinders.

Drilled Wedge Pinewood Block
Cut Your Pinewood Derby Block
Now that you have your axle slots drilled, you need to remove lots of wood from your car block so the block is lighter and you have plenty of room for your LEGO® parts.
Cut the block lengthwise ¼" above the top of the axle slot. If you choose to, you can shape the block to make the nose sharper or bring in the sides, but whatever you do, be sure to leave ¼" above and on both sides of the axle slot so there is enough wood to support your axles.
If you have less than ¼" of wood around your axles and you didn't drill your axle slots (step 1 above!), your axles may split the wood when you insert them.
After you cut your block, sand it to remove the rough areas. This will help your LEGO® parts adhere better to the wood.
Paint Your Block
I know you are anxious to glue some LEGO® parts onto your block, but I suggest you prepare and paint the block first. If you try to sand or paint the block after you have applied LEGO® parts, you will inevitably get paint on the LEGO® parts and ruin your cool-looking car.
Sand all of the sharp edges and rough areas. Next, apply one or two coats of sanding sealer because pine wood is very porous, and if you don't have a base coat, it will soak up the first coat of paint.
Before painting, think about what type of LEGO® car you want to build and choose an appropriate color for the base. You might want a solid black base so it kind of disappears, or you might want a bright red base to make your car hot, or yellow or white so you can apply flames decals that will stand out.
Once you finished painting the base and applying decals, you should put a coat of clear lacquer sealer over it to protect the paint job and your decals.
Add LEGO® Base Plates
The next step is to glue LEGO® base plates on the top of the car. Base plates are the thin plates that come in various sizes like 2x2, 4x4, 4x12, etc. You can use any combination of base plates.
LEGO® Pinewood Derby Car Design Hint:
The ideal width is 6 nodes wide which covers the width of a Pinewood Derby block with about 1/16" overhang on either side, but you must use only 5 nodes wide where your wheels are! If your plates are 6 nodes wide near your wheels, the LEGO® plate will rub on your wheels, slowing your car. So, rather than mix and match, you might want to make your LEGO® plates 5 nodes wide for the length on your Pinewood Derby block.
You can get creative with the colors of your base plates, making one side one color and the other another color, or mix and match lots of colors for a rainbow effect.
To get the maximum flexibility, you would want to cover the entire top of the block with LEGO® base plates. But, if you don't have enough base plates, you can spread them out and build your car above the base plates with bigger LEGO® parts.
Once you have all the base plates in place, glue them down with a good epoxy glue. I've seen too many cars crash at the finish line or slam hard into the stopper, and the last thing you want is your base plates to dislodge and your LEGO® car to come apart and sprawl across the floor.
LEGO® Pinewood Derby Car Design Hint:
Connect the 2nd layer of LEGO® parts onto the base plates before gluing the base plates to your Pinewood Derby block. This ensures that your base plates are lined up perfectly. If you glue them down first and they are not aligned, your LEGO® parts won't connect!
Build Your LEGO® Pinewood Derby Car
The last step is the fun part… making a cool LEGO® derby car design on top of your pine wood base. Be creative and have fun making a cool, unique LEGO® derby car!
The only requirements are that your car should not exceed 7 inches long or be wider than the block plus the wheels, 2.5 inches.
In addition, your car should not be higher than 4 inches so it doesn't hit the bottom of the timer gate.
Once you have the LEGO® car built, you need to glue the parts in place. Glue LEGO® parts together?? Yes! For the same reasons described above, Pinewood Derby cars come screaming down the track and often slam into each other at the finish gate or into the stopper. The faster your car is, the more force it exerts at the finish line.
There is another critical reason for gluing your parts together: graphite!
Friction is the enemy of speed but it is the friend of LEGO® parts!
You need to lubricate (graphite or NyOil) your axles if you want a competitive car, and once that migrates to your LEGO® parts (trust me, it will), then those neat little LEGO® connections will get lubricated and parts will start popping off like Cub Scout popcorn!
Making a Fast LEGO® Derby Car
All of the speed secrets in our free How to Build A Fast Pinewood Derby Car guide and my Winning Pinewoood Derby Secrets book apply to your LEGO® Pinewood Derby Car as well, so make a cool looking car but also build it for speed.
Adding Weight
Like all Pinewood Derby cars, your LEGO® Pinewood car needs weight to reach maximum velocity at the finish line. One essential speed requirement is to make your car weigh as close to 5 oz as possible.
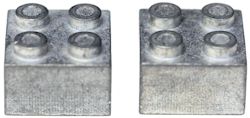
While you can find ways to insert traditional Pinewood Derby weights, like tungsten cylinders or tungsten putty, the easiest way to add weight to a LEGO® car is with a LEGO Zinc Brick weight.

Each zinc weight is .44 oz and easily snaps onto any LEGO® part just like any other LEGO® brick.
Have fun building your LEGO® Derby Car and don't forget to email pictures of your LEGO® Derby Car for our photo gallery.
LEGO is a trademark of the LEGO Group, which does not authorize, sponsor or endorse this site.
Pinewood Pro Winner's Circle

Thanks for the wheels & axles! We won 1st place in both speed & design! - Brian, CT

Joe,
My son just won his Pinewood Derby! You saved the day for me! Although he won a trophy, the smile on his face was the best prize of the evening!
Thank you so much! - Mike, UT

Placed First Place and Best in Show in our Pack and First in the District. Your cars are awesome! - Michael, NY
Winning Tips and Hints
Pinewood Derby
Tips & Hints
If you are using 3/8" round weights, drill your 3/8" weight holes before cutting out the rest of the car because it is easier to hold the full block. Always use a clamp to hold your block before drilling or cutting. Safety first!
Pinewood Derby
Design Tip
Looking for a Pinewood Derby car design template? Select from over 30 of Pinewood Pro's award winning Pinewood Derby Car Designs. They include everything from race cars, to military cars, to a Nike sneaker!
Pinewood Derby
Design Hint
Looking for more cool car design ideas? Our free Pinewood Derby Car Design Guide has over 100 cool Pinewood Derby car design ideas.


